Friday, August 23, 2019

Working on the bi pride quilt

I'm working on my first improv quilt! It's exciting and interesting and making me keep reevaluating how I work. It's for my friend SG, and we decided on the bisexual pride flag for a colour theme. That's blue, purple and hot pink, and I've added in black and splashes of orange. The purple in the bi flag has always been a bit too greyed for my tastes, I'm working with more vivid shades here, and indeed, vividness is a word I've always strongly associated with SG.

I gathered together lots of fabrics, probably twice as many as I need, but it turns out this was the right thing to do. They're sitting in a happy pile on my sewing desk, enough for me to rummage through and make choices, but not so many that it's overwhelming.

Here's where I've got to so far. Some of it is wrong. This is cool.


The classic book on improv quilting is Sherri Lynn-Wood's The Improv Handbook for Modern Quilters. She compares quilt improv to jazz, talking about having limits and structures, but also freedom to explore, far greater than with traditional block quilting. She then has a set of quilt designs you can work through, and calls them scores. I think she actually means jazz lead sheets, and I'm enough of a pedant and a musician that this jars a bit for me. Musical scores are exactly what she doesn't want, because that is where everything is laid out precisely for you to read and perform. Anyway, I'm in the Facebook group for the book, everyone talks about scores there, and I do like the jazz comparison, so I may as well keep the terminology. As with all good quilting books, it's primarily focused on teaching you how to create these designs yourself, understanding the principles underlying them, rather than simply giving you instructions to follow.

Not that I'm following her scores yet! I may try some of them with later quilts. This one has a certain Gee's Bend influence, and it's also growing out of the first improv piece I made, that feeding mat for the cat. I limited myself to four fabrics and liked seeing what shapes grew out of that, with a basic log cabin approach to construction. Here it is before I quilted it. (I did self-binding, and before quilting at that, with no batting. Yeah, no, there's a reason why we quilt before binding. It was worth a try, though!)


The thing about not using a score, and also having to adapt due to sewing by hand throughout, is that I'm having to figure a lot out as I go along. I put an inch of backstitch at the start and end of each seam, for instance, so that I can trim down a bit after sewing. You can cut through a machine-sewn seam, and a lot of improv techniques are based on that, but you can't cut a hand-sewn running stitch seam without damaging it. Backstitch is slower to do but can be cut through, so this compromise works. I did try sewing three strips together with backstitch all the way through, so that I could cut them up in interesting ways, but aside from never wanting to do that much backstitch again if I can help it, the style is off for this quilt, and they're pinned up for playing with another time.

I also found that I can't cut through two pieces of fabric together as other people seem to be able to do, one just keeps sliding off to the side. So I put in a bit more fabric than I need with each piece, then use scissors or a small rotary cutter to shape that side once the piece is on, and draw along the edge onto the next piece to get my cutting line. Yes, I'm sure cutting through both pieces at once would be faster, but not when it doesn't work at all (and I tried changing position, weights, masking tape, the lot). This way it's already going to be accurate. Unpicking and resewing is even more faff by hand than it is by machine, and I avoid it as far as I can.  I've just realised that I'm a victim of my own success in one way: I can piece with deadly accuracy, so I am not used to needing to unpick and redo something, and it doesn't readily occur to me as an option.

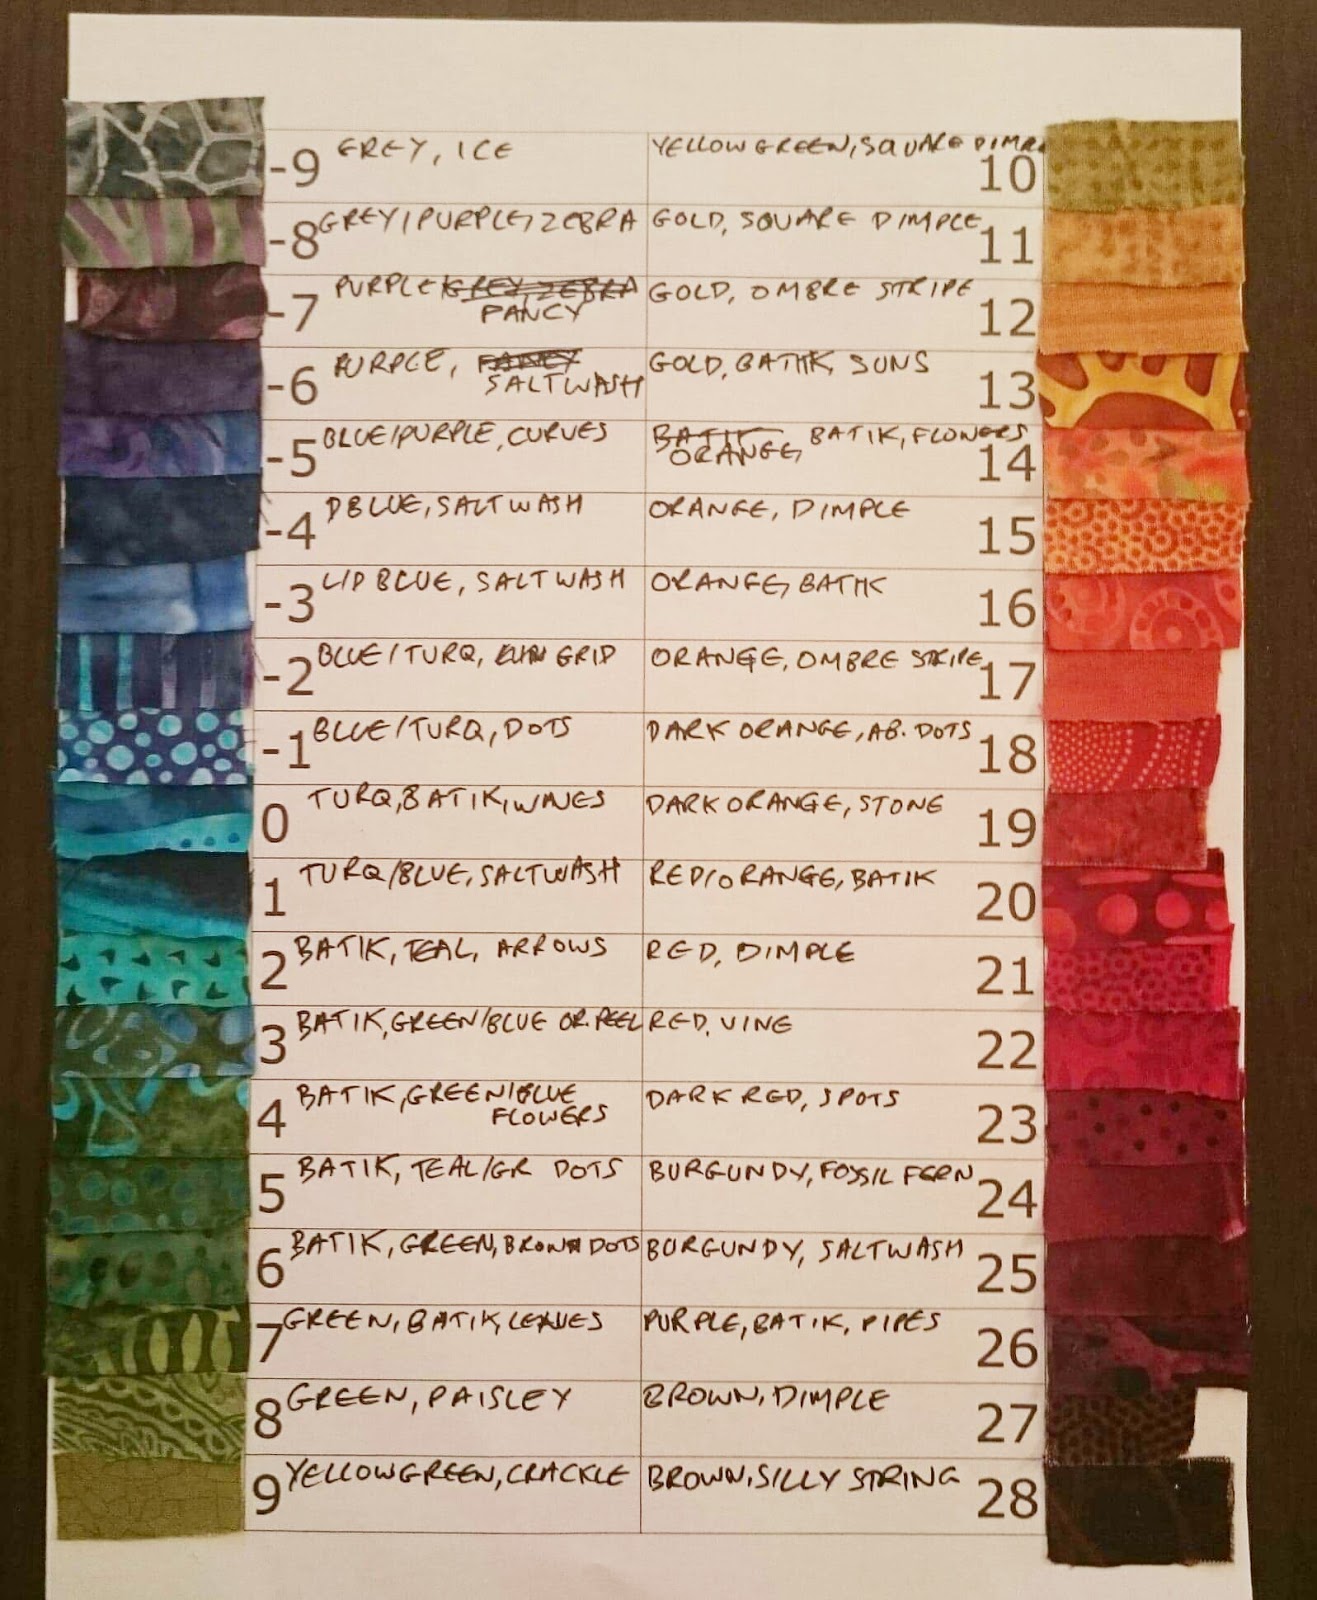
While I'm enjoying a spot of accuracy, I also mark a few points along the seam line. I draw in the corners, mark where there are any seam joins along the edge, and then use a ruler to measure the distance between these points, so that the corresponding marks on the piece to be sewn on are in the right place. It doesn't take long, a minute or two, and means that I can put my pins in the right place and have everything line up nicely first time, with no risk of having sewn one one piece that's actually longer than the other. After that, I eyeball the 1/4" seam, and even with the backstitching at each end, it's still significantly quicker than how I usually do piecing. My usual practice is to mark the seam lines both sides, and to keep checking that I'm on both of them while I sew. I load multiple running stitches onto the needle at once, so it's not as slow as you'd expect, and it's how I am able to do fiendishly accurate complex piecing, but still, it's liberating to be able to skip some of that process.

Going back to design, with the scores in the book, Sherri has done a lot of work for you already, figuring out what limits to set. I knew some limits already, such as the colours and bold feel I wanted, and am discovering others as I go.

Improv quilting seems to appeal to a certain bloody-mindedness in us all, and I think that's a good thing. I happen to enjoy marking, pinning and pressing, probably because I never made myself stick with traditional block quilts. I made one and moved on to making my own designs. However, I've spoken to quilters who spent so many years getting bored out of their skulls with those that they want an entirely different piecing process. One person said it was ten years, that she thought that was how you became a good quilter. No wonder they never want to look at a pin again.

I recently bought Nicholas Ball's book Inspiring Improv, and he's ended up so allergic to pinning and such that not only did he clearly hate putting in a troubleshooting section, but he really prefers to wing it, to the point where he had to cut one quilt in half because it was so far off lying flat! It's a stunning quilt, and was evidently a creative breakthrough for him, but I flinched a bit at that. Sherri has the technical skills you need in her book, and I'm glad I'm learning to do things like take darts to help keep the top lying flat.

For me, the "you can't tell me what to do" rebellion seems to be coming out in wanting to make my own designs from scratch. Or at least closer to being from scratch than following a score from a book, as I am absolutely influenced by the glorious work of other quilters.

In this case, going back to my photo at the top, the block on the left is too wonky to work with the others. I made it yesterday, pinned it up, and had a feeling something was off. I like that I've hit a snag, that I need to work out what went wrong and where I need certain limits to be. When I first made a trial block (not shown) to see if I liked this idea, I found that I did, but my trial block had lines that were too straight, the piecing was too small, and I decided against one of the fabrics.

With this one, it stems from that really weird and ritualistic way quilters behave around fabric. I have a smallish strip of a very lovely hot pink batik left. Quilting hoarding behaviour is kicking in, if hoarding is the right word. I have caught myself applying the word "beloved" to that strip of fabric, and it's a nice fabric but I was never quite that attached to it - hell, I don't even like pink much! So I tried to cut the largest piece I could as the centre for that block, and it ended up a lot further off square than the other centres. Then I tried running with it, adding more pieces with strong curves. I didn't want to waste fabric. I buy fairly small cuts of fabric anyway, most often fat quarters, and have always prided myself on cutting pieces from them in a minimally wasteful way, even with non-geometric piecing.

Well, my first block had lines that were too straight, and now I've hit the other side of that limit. I'm learning all the time. I'll unpick the outer three strips, I think I can correct it from there. I also now have a photo, so that I can explore these particular shapes later in another piece. It made me pause and think about which path I wanted to continue down for this quilt, and yes, I want the path on the right.

Another thing I'm discovering is what working pace suits me. I work slower than a lot of people in the Facebook improv quilting groups, and have long had machine quilters finding that a bit odd, because it doesn't click for them. Someone recently expressed concern that I could sew faster if I skipped the stage of putting an inch of backstitch at the start and end of each seam, even though I need that to be able to cut seams down after sewing them.

I've been thinking it over, and my response to that is, "It's improvised, not rushed." I'm happy working at this speed. (I should note that I can't do that much slower, embroidery or beading for instance are too slow and tiny for me.) The physical process of hand sewing is important to me, it's very immersive, and I can't sew that long per day due to my disabilities.

I like having time to consider a pattern, pinning my work up and staring at the design wall for a while every time I go into the living room. Readers, does anyone else stare at their design wall when they're brushing their teeth?

*hiatus for some more quilting*

Ah, much better! The block I fixed is on the top, with its lines now reading as interestingly irregular rather than outright drunk. I gained confidence from changing that, and the unpicking wasn't too much of a chore.

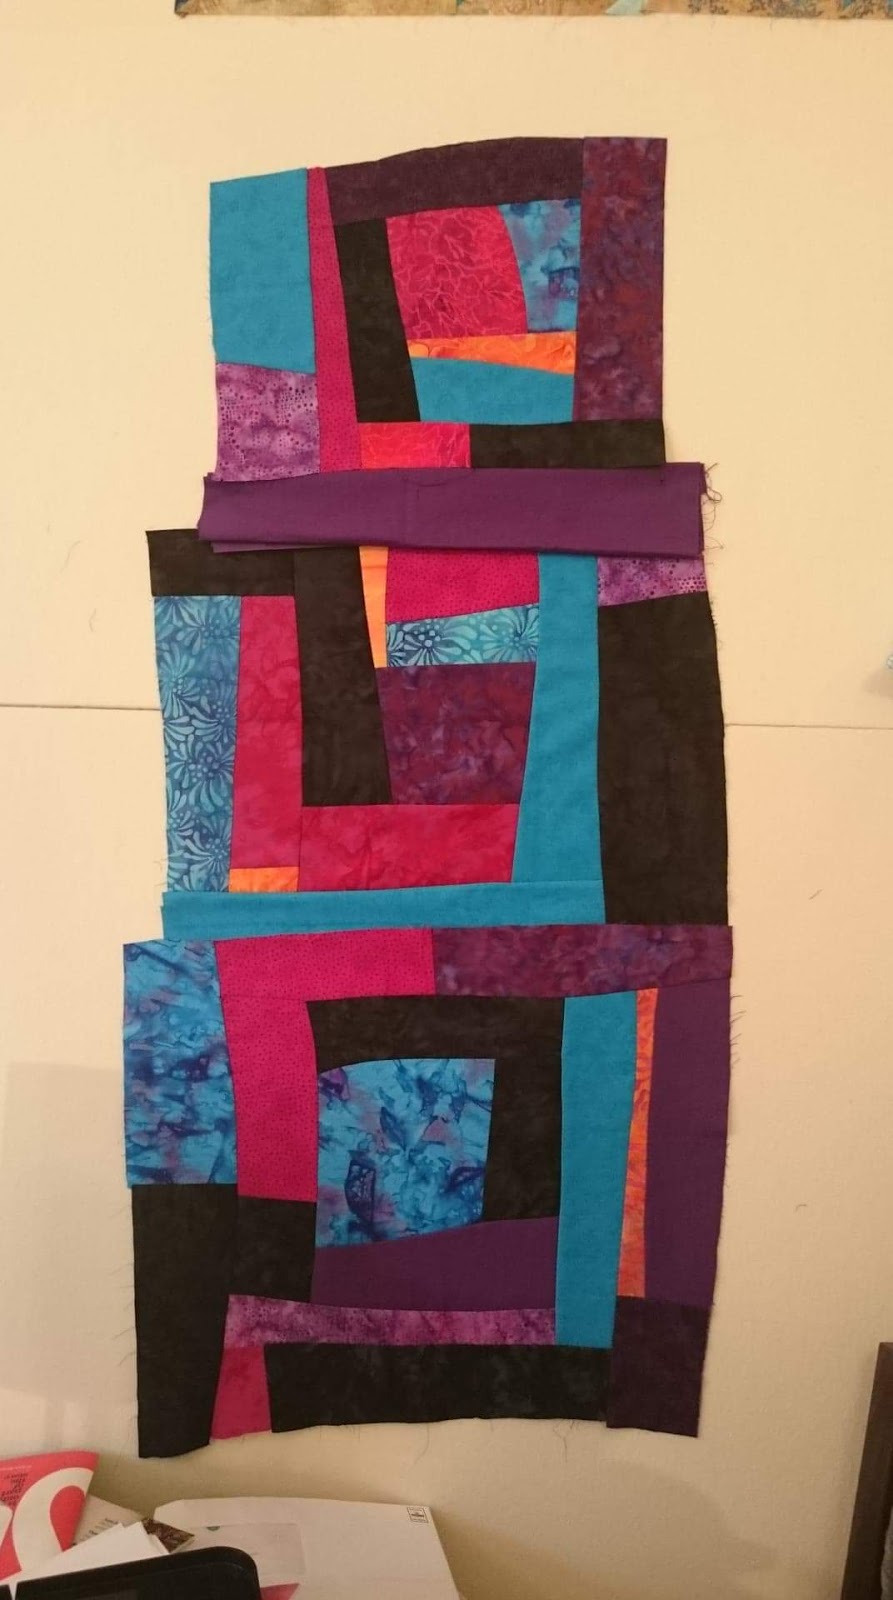
Then there is a piece of solid purple fabric folded into a strip, and then there's the middle block, which I've added more to. The folded strip is pinned over a bit of the block that doesn't quite work. That pink strip in the middle at the top was wider, reading more as a square, and that threw the balance off, so I placed the strip over some of it and will trim it accordingly.  I've been wondering whether a square in a spot other than the centre of a block would work, and now I know.

We're now at my partner's for the week, and I think it's in a good place for mulling over while I return to working on his quilt. The other half of his quilt needs to be marked up now, and I've been ill and really don't have the spoons for it. So the plan is that we'll do it together, and he'll do as much of the physical work as he can. Sitting at a low but big table to mark up a quilt is surprisingly tiring and hard on the legs.

Sunday, July 28, 2019

Methodist knot tutorial

I learned the Methodist knot method of utility quilting from the book Rotary Riot: 40 Fast & Fabulous Quilts by Judy Hopkins and Nancy J. Martin. Someone in a quilting group kindly sent me a set of photos of various utility stitches in that book, and this is the second one I've tried after crowfooting.  I choose it for the wheelchair quilt as the top was so busy that I felt crowfooting would be fighting with it, and indeed the Methodist knotting fitted in beautifully.  

Here is the wheelchair quilt enjoying some sunshine and being photobombed by a painted lady butterfly.  There were dozens of them in the garden, enjoying the first sun in two and a half days of solid rain.  They mobbed the buddleias, sunbathed on the wall, and pairs of them danced together.  It was spellbinding.


As with crowfooting, this method is very gentle on the hands, even if you are disabled, and it's quick to do.  You don't need a quilting hoop or frame, and I find it comfortable to do Methodist knotting while sitting in bed.  When I did a row of big stitch quilting around the edge of the quilt at the end, to give the binding more definition, I noticed how much harder it was on my hands with such a thick quilt, and was very glad I'd chosen Methodist knotting for the rest.

The stitch is a little less obtrusive than crowfooting, looking like an exclamation mark.  It complements the wheelchair quilt top without overwhelming it. The coppery variegated embroidery thread I chose (DMC 4130) shows up just enough to be interesting, and echoes the burnt orange flannel used for the backing and self-binding.

I went for three strands of embroidery floss as perle #8 didn't come in that variegated colour, and it behaved reasonably well.  You could also use perle #8, which would behave impeccably, and if you can manage to hide your knots without leaving visible holes, perle #5 could look stunning.

A #7 embroidery needle worked well here, and now that I am using #7 short darners for my crowfooting, I'd probably choose those instead.  They're the same diameter and also have an eye that is big enough to thread comfortably without being so big that the thread falls out, but they're a little longer.  If you are going to space your stitches much further apart than I did (which was 1"), try #7 long darners, or if you want then several inches apart, look at doll/soft sculpture needles.

As with crowfooting, this stitch can be used as a replacement for tying a quilt, which seems to be how it is traditionally used, or spaced more closely and used as a quilting replacement.  I spaced my stitches 1" apart and my rows 2" apart, and it reads as somewhere in between tying and quilting, I think.  This was a very thick quilt, with two layers of Polydown batting and a flannel back, so it looks very puffy, and you get a nice channel effect between the rows.  

My rule for these utility quilting stitches is to make sure the distance between rows is a minimum of double the distance between stitches, for them to read properly as rows.  The constant back and forth of the backstitches means the stitching is nice and secure.

If you are Methodist knotting a quilt that has an ordinary batting, you could possibly layer and secure your quilt as if for basting, then go straight into the Methodist knotting and skip the basting.  I was going through a very thick quilt, so I thread basted as usual, and was glad I had the flexibility to move the quilt in my hands while working on it.

You can space your stitches by eye, or mark them up in advance.  I made myself a little template with gridded acrylic and marked two stitches for each 3" half-square triangle, making the lines for the stitches a little over 1/4" long, and using Crayola washable marker pens.  Experiment on a trial sandwich to find which stitch length works for you, making sure your stitch that goes through to the back shows up there.


There are the instructions from Rotary Riot.  I spent a while staring at them in bewilderment, so here is a series of photos breaking it down further.

 1. Tie a knot in your thread 1/2" to 1" from the end, with two wraps if it's perle #8 or three strands of embroidery floss, and one wrap if it's perle #5.  By now I've had one knot pop out of this quilt and have to be sewn back in, so I reckon the longer tails will help keep it better secured. Insert your needle into the quilt 1/2" to 1" away from your stitch, in the direction you are coming from.  Take it through the batting, without going through to the back, and bring the needle out between 2/3 and 3/4 of the way along your marked stitch, here shown with a black marked line.

 2. Pull the thread through, here shown just before you bury the knot.  Pull the knot through with a sharp tug, using your other hand to hold the quilt nearby to make it easier to pull through.  Rub your thumbnail over the hole left by the knot a bit, and that should move the fibres back together so that the hole is gone.  (It's much trickier to do this with perle #5, and it probably depends on the weave of the fabric.)

3. Push your needle down, all the way through to the  back.  This is the only time your thread will go through to the back of the quilt, and you can feel to make sure it's going through with your non-dominant hand, which is under the quilt top.  If your batting is thin, you can take an ordinary backstitch without fuss.  My batting was very thick, so I had to angle the needle straight down at the start of the backstitch, as you do when making rocking stitches with traditional quilting.

 4. Make a backstitch, going through all the layers, and bring your needle out at the front of the marked line, so that it is coming out a little ahead of where the thread is currently coming out of the quilt.  Pull the thread through.  This is your first backstitch, and is the long backstitch. It produces a single straight stitch on the back.

5. Put the needle back in at the point where the long backstitch started, where the long and short backstitches meet.  This will be your short backstitch, and will only go through the batting.  It will not go through to the back.

 6. Travel your needle through the batting and bring it out in your next stitch, 2/3 - 3/4 of the way along the stitch, ready to begin the long backstitch for your next stitch.  In this photo, I have turned a corner with my quilting line.  You have now finished one Methodist knot stitch and are starting the next.

7. To end a line of stitching, when you are finishing your short backstitch, put the needle in at the point where the long and short backstitches meet, travel it through the batting only, and bring it out 1/2" away.

8. Tie a knot, insert the needle back in exactly where it came out, go through the batting only, and bring it out 1/2" or so away, angling it in a different direction this time. This will make it easier to pull the knot through and get it hidden beneath the top.

 9. Pull the thread through and give it a tug to bury the knot.  Here you can see it just before the knot is pulled through.  Rub your thumbnail over the hole to make it disappear as before.  Snip the thread where it comes out.

In other wheelchair quilt news, the Robert Kaufman Shetland flannel (herringbone weave, pumpkin colourway) was as divine as expected for the backing, and makes a nice self-binding as well.  The whole thing is wonderfully cosy, and while it's not yet cool enough to be needed as a wheelchair quilt, it's a great small-but-warm extra layer to keep around the flat, for instance if I'm colder in bed than my partner is.  I'll do something cunning with velcro for attaching it to the wheelchair footplates when the weather gets cold.


Wednesday, June 19, 2019

Multitasking

Lots of quilting progress! It turns out that I get distinctly bored when sewing together 238 half square triangles. I am trying to remember the last time I made a quilt from one shape, and I think it was my bedspread a decade ago. At least I found this out before committing to a large quilt with this design, which I'd been considering. I have a mini design wall on my sewing desk, and transfer a sixth of the wheelchair quilt to that at a time for piecing. Here is it with three columns sewn so far.

I've also found the perfect solution, which is to alternate the wheelchair quilt with the temperature quilt. I sew four units of the wheelchair quilt, get them sewn into a column and attached to the previous column, then do one catchup day of the temperature quilt, and switching back and forth keeps me happy and motivated. I'm now caught up back to the start of April, working backwards. 

I should have put more gold in my fabric range, and am worried that I'll run out of the ombre fabrics for 12° and 17°, but otherwise its going well and starting to look very nifty. I joined Instagram, where there's a nice little community for making temperature quilts, and here is a mini tutorial I posted there on how I use freezer paper piecing for making the temperature quilt. 

Another odd thing about making the wheelchair quilt is that the pieces are 40% smaller when sewn than when they're laid out with their seam allowances showing, as they're only 3" half square triangles, and it throws me to see them together. I'm not sure why, maybe my brain is insisting that the smaller pieces are further away, and then realising that's not the case? Now that it's two-thirds sewn, it seems to be snapping back into making sense for my head, thankfully. 

Something I only realised about myself in the last year or so is just how neurodivergent I really am. It looks like autism and ADHD, though getting diagnosed as an adult woman is very hard, so I may never know officially. It is making it much easier to work out how different things exhaust me, which is an ongoing chore when you have ME/CFS wiping you out. Between that and finally figuring out the best way to use my Fitbit data (I colour the tablet status bar in  segments to show sleep, steps, heart rate and so on), I'm pacing myself far better. This also means I'm doing more quilting, which is an absolute joy. Well, either I'm pacing myself better, or I'm due for an almighty crash.

I definitely overdid it yesterday, and will need to be doing lots of resting under a cat for a few days. I had finally prepared the huge spiral stencil for R's bedspread, cutting it in between piecing the wheelchair quilt and temperature quilt (three things on the go suited me surprisingly well, I had a nice little routine set up), and brought it over to R's. It's A2, cut in such a way that if you want to make the bigger spirals, there's quite a lot of repositioning. 

Then I clipped the quilt onto the board we use to extend R's coffee table for board games, which covers just over a quarter of the quilt, and got half of it marked up over a couple of days. It's surprisingly tough work, especially on the legs, and naturally the marking pens decided to die near the end. I am hoping that the Crayola marker pens wash out as well as I remember, since with crowfooting you don't cover that much of the marking line with stitching.  So I'm in exhausted-but-smug mode. 

Still, that's several months' quilting prepared, and the quilt is now back on the bed and is a delight to work on. Despite having royally overdone it with the marking, I couldn't resist doing some quilting yesterday, and it is indeed much quicker, easier, and more fun to work on than traditional hand quilting. I've done three spirals so far, and am loving shifting the thread colours gradually for each one. The first one, which is the big extended spiral, was yellow - orange - pink - lavender, then one in four shades of sea green, and now I'm on one in different shades of blue. I keep getting urges to buy ALL THE THREADS, although I have some thing like 80 colours in perle #8 now and shouldn't need to. I admit to sneaking my DMC colour card out to check this morning, and there just aren't many of the brighter light blues anyway. I'm sure I'll be fine, I have boxes and boxes of thread.

Here is the quilt on the bed, being approved by the cat. You can see some of the crowfooting on the left. I really like the effect I'm getting with the different coloured  lines of stitching curving over the black sashing in particular.


Saturday, June 8, 2019

Notes for a 2020 temperature quilt.

I'm getting ideas for next year's temperature quilt, so I'll jot them down here and revisit them at the end of the year.

Use two strips per day again, but this time have the days running horizontally and the months vertically instead of vice versa.  Each month would have two rows of 14-16 days, or rather four rows including the highs and lows.

Put the lows above the highs this time, as they most often relate to the early morning rather than the late night, and it's bugging me.

This way the warm colours are going to flow across the centre horizontally, rather than being down the middle as with the 2019 quilt.

Make the rows curve.  This could be abstract swirls, or it could resemble mountains.  Do a new curve for each month, and then divide up the four rows within that, and then divide up according to days.  The height of the rows will vary, so I can change the width of the days to compensate for that a little, to give more evenly sized pieces.  Although that might look odd and unbalanced, and I may just have to live with some months getting more focus than others.  Perhaps try to keep the overall area occupied by each month consistent.  Is there a way of doing that with software?  Somhairle will likely have ideas.  Drawing a faint line for dividing it up into each month, and then making sure that the area of the curve above and below that line is roughly equal, should do the job.

Use tic marks on the freezer paper template to indicate how to join the curved rows together.

If January is at the top, then there will be a bigger area of cool temperature colours at the top than at the bottom.  Sky, then mountains, then a lake?

Make it wider than it is tall.

If going for a mountainy vibe, look at Scottish landscape pictures.  Tilt the colours more towards cool and greyed tones, perhaps put in lavenders in an unexpected place in the colour order, browns.

Alternatively, the summer could be a gold and fiery explosion coursing along the middle.  Think sun mosaics.  Some sort of triangles?

Use the 2019 quilt to get an idea of temperature distribution.  See how it works out to vary the high/low proportions according to the day/night length.

There will be much more distinct lines for each row this way, as an entire row will be highs, then lows, alternating all the way through.

Sunday, June 2, 2019

Temperature quilt: begun!

The temperature quilt is underway!  The prep was different and fun.  First of all, I had to gather my fabrics.  Someone doing a temperature quilt in Manchester advised me to use a different fabric for each degree C, and I'm glad she did, because you definitely need it.  I laid them out in a row, and then put every other one in the row above, to check how they fared when split up a bit.


I scrapped the second-bottom grey, it didn't quite fit, and the bottom grey can be divided into light and dark if need be.  That's for -9, which has only turned up once, so unless we have an unusually cold winter at the end of the year, it won't be a problem.  There was that year, 2010 I think, when the temperatures went down to -16 at night, but that was incredibly unusual, and we still talk of the snows and the difficulty the UK had in dealing with them.

Some fabrics are variably enough patterned that they could cover a few different temperatures, but I think that overall it will give the idea, and I am learning to relax and not worry about whether each fabric tells you the specific temperature unambiguously.  A little bit was cut off each to make a chart.

Next, I had to work out the pattern.  There was just enough freezer paper left, once I cut it up here and taped it together there.  I had been enjoying myself immensely the week before, making every possible chart in a spreadsheet.  That included working out which of the four sections per month would have 7 days and which would have 8 days, and then writing it all down reversed, because with freezer paper you are working in mirror image.

I drew my 4" x 12" sections with rulers, then subdivided them all into 7 or 8 days accordingly, and divided each of those sections into two, varying the proportions according to whether the day or night was longer on that date.  Marking them all up took a while, as they all needed the date, temperatures if the date had passed, and a little up arrow, which has proven to be invaluable.  I still ended up sewing two pieces together the wrong way around last night, but I noticed immediately and it was easily fixed.

Here's what they look like after each day's pieces have been cut up, ironed onto fabric, and the fabric has been marked up and the pieces drawn around.  After this, the pieces of paper are peeled off and binned, and the two pieces are sewn to each other, and then added to the seven or eight-day block they are part of. 

There's one piece for an earlier block where I copied in the wrong temperature and noticed a few days later, but it turned out to be fairly straightforward to unpick the offending piece, make a new paper template for it, and replace it with the right fabric.  It can be comforting to make mistakes early on, and know that you have a way to deal with them.

I was starting with the last block in May, but I wanted to see how this would look for a whole block, so I pulled out what I thought was the previous block for May.  It turned out to be the first block in May instead, leaving me with the two in between to catch up on.  I've now done the second one, so there's only the third to do and then the whole of May is done, as by now I've also finished the last block.  I've never been so interested in the weather forecast, and was downright excited when there was an overnight low 2 degrees that allowed me to use that pretty teal fabric for the first time.  I'll post the set once I've done that third block.

As expected, there are a lot of soft greens and golds together.  I'm really looking forward to seeing what the winter will look like, with those blues and greens, occasional purples and the odd flash of gold.  I've used a few reds so far, but I doubt I'll need them all that much.

It'll also show up starkly how unseasonal the weather is getting, like that worryingly warm patch in February, or the three hot days in April where I ended up basking in the hammock in R's garden in a tasteful nightie, because I didn't have any sundresses to hand.  I've noticed a couple of people on Instagram - Instagram appears to be The Place To Be for these quilts, and I finally sorted out joining - talking about how the weather is "in God's hands", which appears to be code for being climate change deniers.  Gah.  And when I'm seeing so many American quilters in Facebook groups talking about being flooded out, too.

Thursday, May 30, 2019

Wheelchair quilt: planning and piecing

It's ridiculous how easily I get chilled, so I've decided to make myself a wheelchair quilt.  I do have something already, a length of black polar fleece folded over double.  Only it always blows up in the wind, and it's hardly inspiring, and tends to get lost in the cupboard and never used.  For this quilt, I plan to do something nifty with velcro so that I can easily attach it to the footplates, and the quilt will moonlight as an extra layer to grab for the bed or sofa when needed. The fleece is a good size, 36" x 30".

There were lots of triangular bits left over from the stripes I used for R's bedspread, due to cutting all those quarter-square triangles, so I went for 3" half-square triangles (HSTs), with random placement.  I've fancied doing a randomised HST quilt for a while, and when hunting through photos of quilts made with striped fabrics on Pinterest, came across the 80s and 90s quilts of Michael James, which helped me visualise it.  I still have a bag full of scraps, but a lot of them made it into this quilt, and it was surprisingly easy to mark up and cut.  It took only a few days to cut the 238 triangles required, and then a day for putting them up on the design wall, staring at it, and rearranging until I was happy.  I've never designed a quilt top so fast, it's amazingly liberating, and everyone has been blown away by it.


Nifty, eh?  I cut most of the pieces before I started to arrange them on the wall, then cut the last few based on what I felt it needed.  They're almost all Kaffe Fassett woven stripes, plus a Peppered Cotton in green.  I'd put in one in rust, too, but it looked oddly dirty next to the stripes.

There's a little mini design board on my sewing desk, made from polystyrene board and some batting, and that's enough to hold 20 of these blocks at once, so I'm transferring a sixth of the top to that at a time for piecing, and have made the first section.  I photographed it and refer to that, and still ended up with one block rotated by 180 degrees, but it's a flexible design and it looks fine.  The blues and greens are the ones I'm pickier about.  What is really striking is how much smaller the pieces are when sewn.  It's only a 1/4" seam allowance, but the area ends up 40% less.  Here's the mini design board with the blocks on the left sewn.

Robert Kaufman Shetland flannel
This quilt is intended to be small but really warm.  I'm going to use two layers of Polydown, a fairly high-loft batting, and a Robert Kaufman flannel on the back, one of his Shetland flannel range in a gorgeous herringbone weave and the "pumpkin" colourway.  I've got quite a few of these flannels tucked away in my stash, as I have plans to make some heavy quilts in the future.

The next question is how to quilt it.  Crowfooting would be too busy, and while I may be up to big stitch quilting on the right combintion of fabrics and batting, this isn't that.

So I looked at the tacking stitches available again.  Cross stich has never really appealed to me, and neither does the Mennonite tack, which forms an elongated cross and looks a bit too religious for my taste.  I'm not from a Christian background, and probably wouldn't want it on my quilts even if I were.  (This is also why you won't see me doing the cross blocks popular in improv piecing.)


The stich I've decided on is the Methodist knot.  There are instructions for all of these tacking stitches in the book Rotary Riot, by Judy Hopkins and Nancy Martin, and someone was kind enough to send me photographs of the relevant pages.  I believe they can also be classified as a form of utility quilting, and tacking doesn't seem quite right to me, it sounds too much like basting when it's a permanent form of stitching, not to mention that I'm spacing it relatively closely.  This knot is formed by making two backstitches, one long and one short, looking rather like an exclamation mark and leaving a single horizontal stitch on the back of the quilt.  I've made up a sample sandwich and it works out nicely, with a surprising amount of texture and direction added by the lopsided stitch.  There's a lovely variegated DMC embroidery thread in copper/rust tones which looks perfect against the quilt, and groups online tell me I should be OK using embroidery thread, though I'll test first in case of bleeding.


I'll stitch a line down the centre diagonal of each triangle, which will bring out the pattern and mean that my lines of stitching are a nice 2" apart.  After drawing it out at full scale, I think I'll go for two stitches per triangle rather than three, though both look good.  The spacing on the samples are closer, more like how it would be with three stitches per triangle.  It still obeys my rule of doubling the distance between stitches for the distance between lines of stitching at a minimum, and judging from my sample piece, will still create the effect of lines of quilting in terms of indenttion.  It's been suggested to me that it shouldn't be too dense anyway, in order to maximise pockets of air and thus warmth.

Looking up wheelchair quilt design online was an odd experience.  I picked up some good tips - back it with flannel so that it's warm and less likely to slip off, cut off the corners so they don't get caught in the wheels - but mostly I saw lots of waffling from people who have never used a wheelchair and haven't bothered to consult any wheelchair users.  You could practically make a bingo card.

* well over a foot too long and/or wide. Bonus points for being two feet too long!

* top of quilt drapes over the wheels so that they can't be pushed

* bottom of quilt trails on ground

* quilt has entirely eaten the wheelchair user

* headless model in photos

* remarks about how the quilt is needed "in case your skirt or dress rides up" (we can pick our own clothing and be sexy if we want to, OK?)

* "wheelchair bound" or "confined to a wheelchair" (it's not a bondage accessory)

* telling people to buy it for the wheelchair user, rather than being anything an actual wheelchair user would pick

* three quilt blocks and acres of border, leading to a rather odd apron effect, and always combined with an unbelievably twee design

* footplates entirely absent, and the grinning Random Old Lady Model wearing slippers

* size explicitly designed around multiples of a quilt block, rather than what will actually fit the user
* batting skipped, resulting in a quilt that won't be nearly warm enough (we tend to run colder than people who are walking about)

I ask you.  Thankfully I did chat to some quilters who are wheelchair users, and a few more people who have worked with wheelchair users and respect us, rather than the dreaded "well I made quilts for an old people's home once" ones.  It's always depressing how many people think they should get cookies for merely knowing someone disabled.  We're a sixth of the population!  Of course you know some of us!  And if we say we want batting that dries quickly in case we get caught in the rain, we do know what we're talking about!

Tuesday, May 21, 2019

Temperature quilt plans

I have this idea in my head that I only work on one quilt at a time.  OK, a piecing project at my flat and a quilting project for when I'm at R's flat every other week.  Fine, then, each of those, plus I have now fallen in love with temperature quilts, where you make a block each day.  That'll only be a little extra, right?

The idea with these is that you set out a code for which colour each temperature corresponds to, and then make a block for each day in the year, showing the temperature variations through the ebb and flow of colours.  I'm going to do the version with two pieces per day, one for the high temps and one for the low temps.  Since I'm starting halfway through the year, I'll make it to cover 2019, but when it gets to 2020, I'll be doing the block for that day for the previous year instead.  It's too much to catch up with otherwise.

There are several ways you can do this.  Flying geese blocks are popular, half-square triangles turn up in various incarnations, there are some exciting variants with hexagons, and sometimes people use strips.  If you are going to have the day of the month as your rows and the month as your columns, you end up with rectangular blocks if you want to end up with a square quilt.

Linen stack
I've decided to do two horizontal strips to make a block, stacked to make larger sections, which I suppose is a form of string quilt.  Right now I'm at R's and don't have access to my stash, but I've just received a set of linen blend samples in an order from Fabric Inspirations, so these work as a mock-up.  The strips won't be dead horizontal, but rather slightly angled and curved, giving it a more organic feel.

Temperature quilt by Erin

This is a traditional temperature quilt using flying geese, to give you an idea of how they most often look.  The centre triangle in each block shows the high temperatures, and the two smaller triangles on either side show the low temperatures.

As I will be using two strips for each day, I have divided each month into four sections, each made up of 7 or 8 days, so 14 or 16 strips.  After fretting a bit about whether I should try foundation piecing and if so how on earth to do it by hand, I realised that freezer paper templates will do the job beautifully.  I'll mark up some freezer paper, cut it into the sections, and then cut off each day's strips as I go.  The sections will be 4" x 12", giving a 48" quilt before borders.  That should be a nice size for a wall hanging, perhaps to go above my bed.

The quilter I got this idea from is Ann Brauer.  She makes beautiful quilts reminiscent of skies and seas, using lots of little stacked strips.  In her case, with machine piecing, she says she sews straight onto the batting, doing it in sections in a form of quilt as you go (QAYG).  I'm borrowing the sections idea, it seems to be enough to make it manageable to piece but not enough to take over and make it look too rigid.  Here is an example of her work, which shows how effective occasional contrasting strips can be.
Ann Brauer, Gentle Dawn
I love the way those deep oranges glow against the blues.

Ann Brauer, Purple Mountains

Ann Brauer, Summer on the Meadow
Looking at these made me realise that if I'm drawing those strips freehand, they don't have to be exact.  I can make the high temp strips taller when the days are shorter, and shorter in the winter when the days are longer.  I think that'll give a better feel for whether the warmer or cooler temperatures are more dominant, giving greater emphasis to the blue end of the colour range in the winter and the golds and reds in the summer.  It'll also add variety, along with the strip height naturally varying due to having either 7 or 8 days in a section.

The next question, of course, is colours.  Most of these quilts are based on a rainbow, often quite bright.  There's a lovely pair of flying geese quilts done by sisters in Alaska and California, where they've used similar colour schemes to produce very different results according to their different climates.  They're glorious, but they're brighter than I think I want in a large wall hanging.

Stacking those linen samples made me realise that a more muted colour scheme could look stunning.  I'm hoping to achieve something reminiscent of the Scottish landscape.  There will be lots of soft blues and greens, probably a few brownish colours on the way to the golds and rusts, and I want to try using lavenders, mauves and greys for the temperatures below freezing.  The "landscape quilts" section I'm building in my Pinterest is quite swoonworthy. Look at these, for example, by the textile artist Rachel Wright.

Rachel Wright, After the Storm

Rachel Wright, Into the Storm

Most of my stash is batiks, and while I think they will largely be too bright, there are plenty which have always been a bit too muted to use with the rest, and I'm eager to get home to them and see how they work together.

The quilt I'm actually working on at my flat is a little wheelchair quilt made from the scraps from R's bedspread, using randomised 3" half-square triangles.  I've already cut about a third of the pieces for that in one day, so it shouldn't take too long to get that part done.

I'll aim to begin the temperature quilt at the start of June, which gives me the next ten days to select fabrics and draw it out on the freezer paper, while also cutting my striped triangles for the wheelchair quilt.  R is away for a conference for the rest of this week, giving me the whole ten days in my flat instead of the usual week.  There will be much revelling in fabric!